Git Learning Notes
Git Learning Notes
Updated:
阅读中文版
Git
1. Introduction and Installation of Git
1.1 Introduction to Git
After Linux creator Linus created the open-source Linux operating system in 1991, it grew over the years through the collective efforts of enthusiastic volunteers worldwide and has now become the largest server operating system in the world. In the early days, code contributors would send source files to Linus, who would manually merge them. After years of this workflow, the codebase grew so large that manual merging became unsustainable. Linus, who deeply disliked centralized version control systems, chose BitKeeper, a distributed commercial version control system, though the Linux community builders could use it for free. BitKeeper changed Linus's understanding of version control, but he also discovered some shortcomings in BitKeeper. Moreover, a critical issue prevented its widespread use: it was not open-source.
In 2005, the company behind BitKeeper discovered that someone in the Linux community was attempting to crack it, and BitKeeper decided to revoke the free usage rights for the Linux community. After weeks of unsuccessful mediation, Linus searched through all known version control systems of the time and found none satisfactory. In a fit of frustration, he decided to build his own. Linus spent ten days writing an open-source version control system in C, which became the famous Git.
In 2007, three young people in San Francisco thought Git was a great tool and founded a company called GitHub. The following year, they launched the website of the same name, written in Ruby — a free code hosting site based on Git (with paid services available). Over the next decade, the site skyrocketed in popularity, defeating the powerful Google Code to become the world's most popular code hosting platform. In June 2018, GitHub was acquired by the deep-pocketed Microsoft. In January 2019, GitHub announced that users could create private repositories for free. According to GitHub's annual report from October 2018, 31 million developers had created 96 million project repositories, with 2.1 million enterprises onboard.
In one sentence: Git is currently the world's most advanced distributed version control system.
1.2 Centralized Version Control Systems
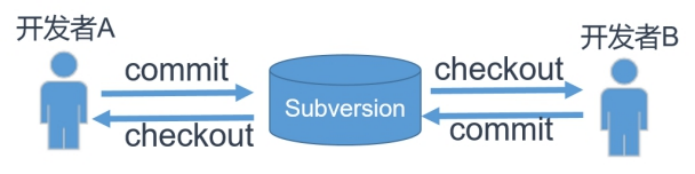
Advantages:
The SVN repository is centrally stored on a central server. When working, you use your own computer, so you first need to get the latest version from the central server, then do your work, and after finishing, push your completed work back to the central server.
Disadvantages:
You must be connected to the internet to work. If you're on a LAN with sufficient bandwidth and speed, it's fine. But if you're on the internet with a slow connection, it becomes frustrating.
- If the version management server crashes or the hard drive fails, how do you recover the code?
- The code uploaded to the server by programmers is required to be a complete version, but what if programmers want to manage smaller versions during development?
- The system is running in production, bugs need to be fixed from time to time, and adding several new features takes months — how do you manage multiple versions?
- How do you manage a large development team spread across the world, where members don't know each other?
1.3 Distributed Version Control Systems
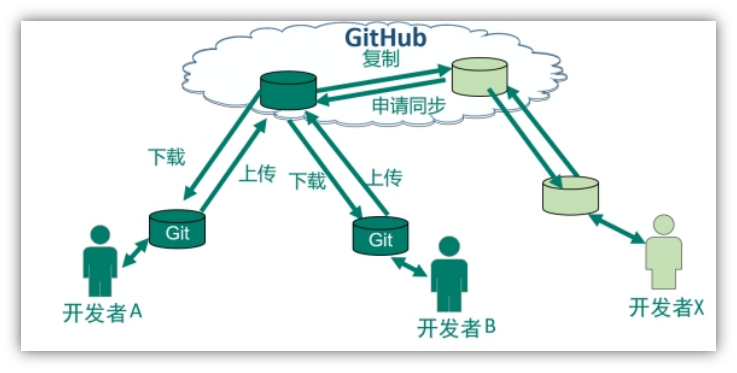
Git is a distributed version control system, meaning it has no central server. Each person's computer is a complete repository, so you don't need to be online to work since all versions are on your own machine. Since everyone has a complete repository on their computer, how do multiple people collaborate? For example, if you modify file A on your computer and someone else also modifies file A on theirs, you simply push your changes to each other, and you can both see each other's modifications.
1.4 How Git Works
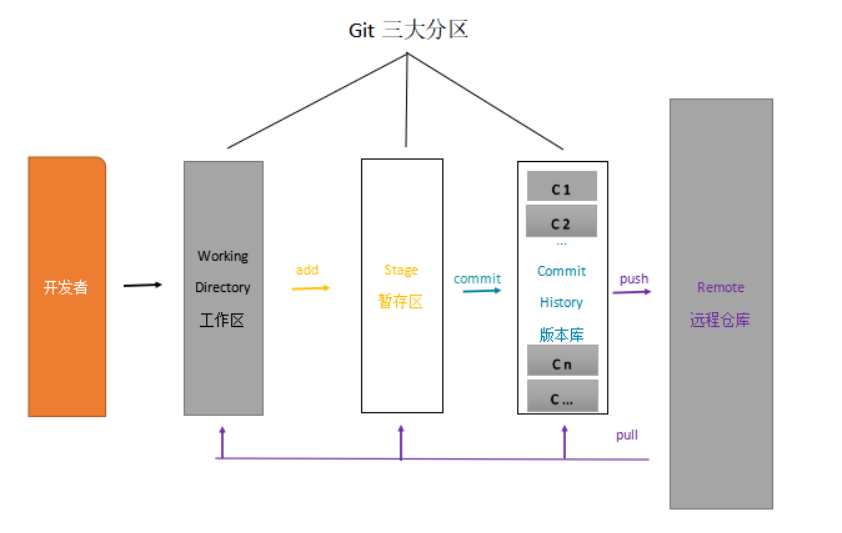
Note: All Git commands start with git.
1.5 Installing Git
Download address: https://git-scm.com/download
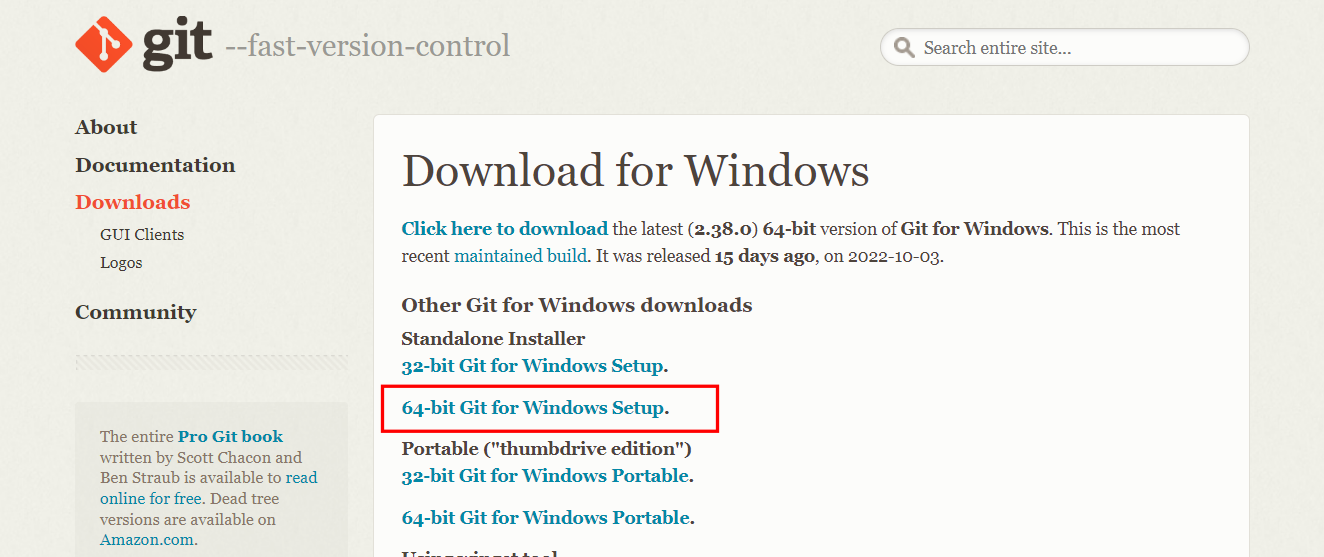
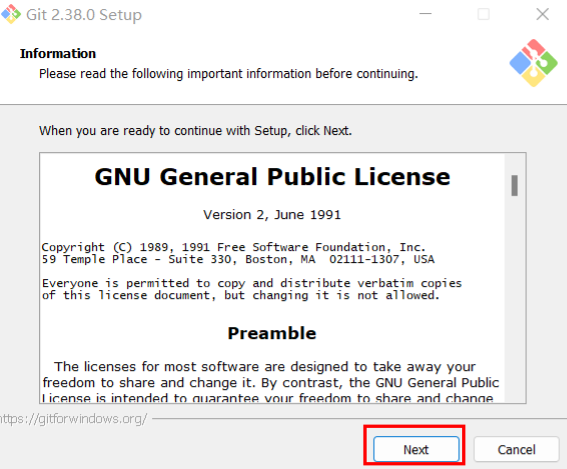
1.5.1 Review the license agreement, click Next
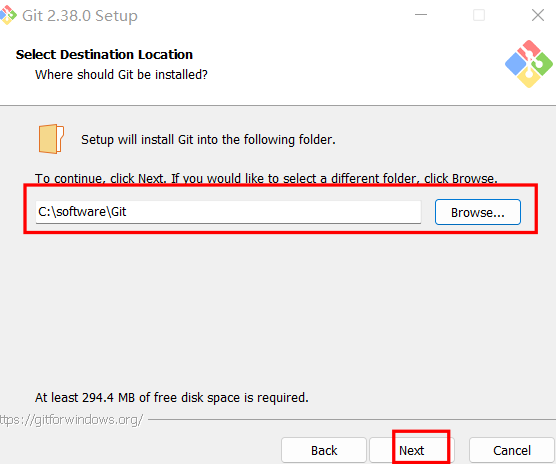
1.5.2 Choose installation location, click Next
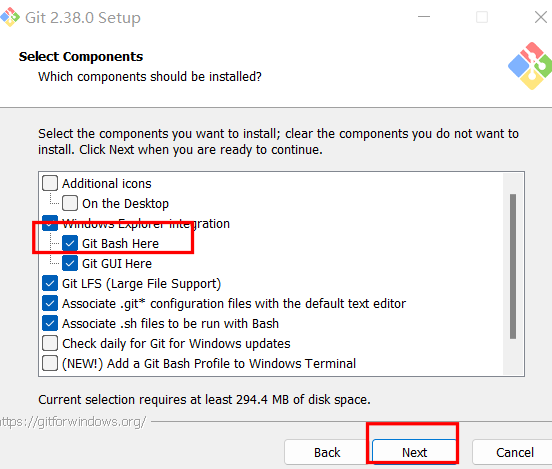
1.5.3 Git Bash needs to be selected; for the rest, just click Next
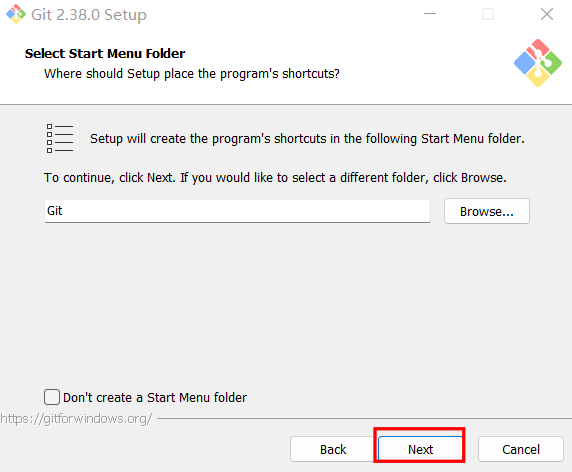
1.5.4 Default, click Next
1.5.5 Default editor, click Next
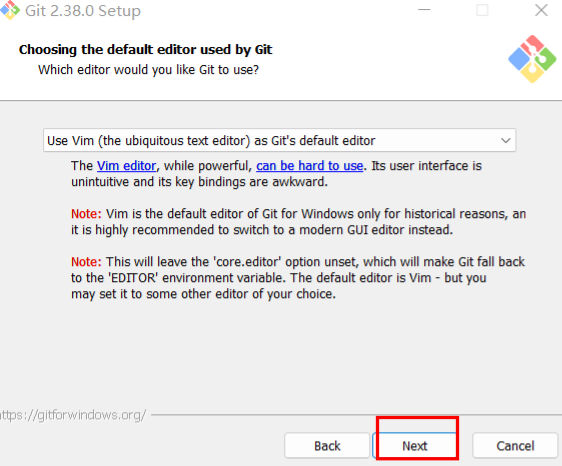
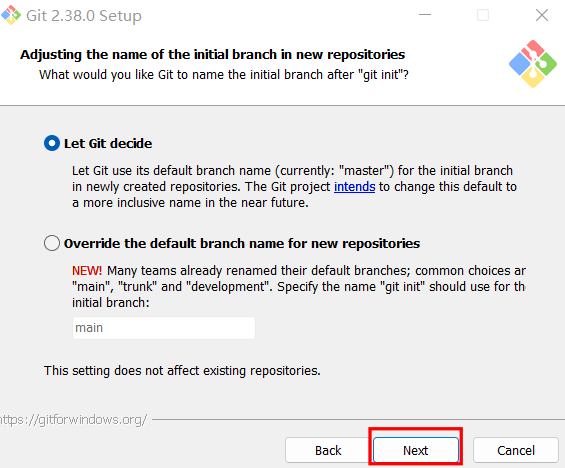
1.5.6 Default, click Next
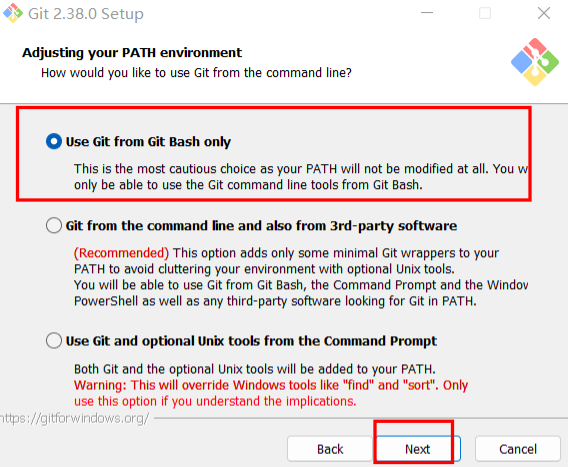
1.5.7 Choose the Git command execution environment
It's recommended to select the first option, which uses Git's own dedicated command line window.
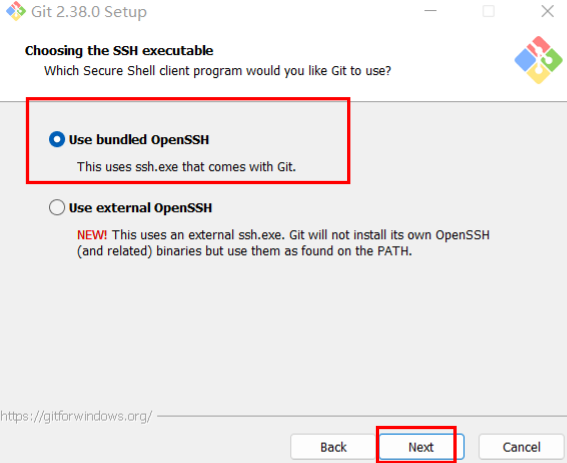
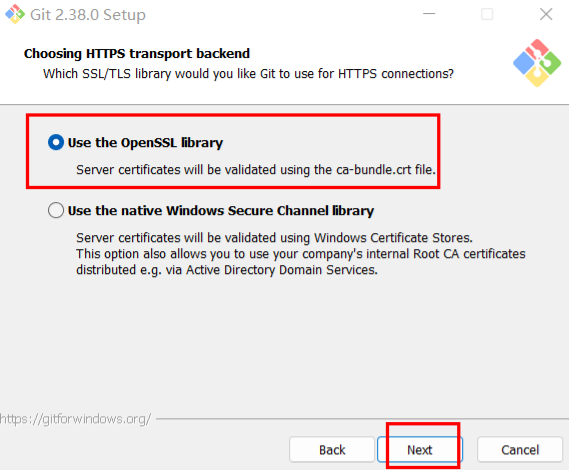
1.5.8 HTTPS transport protocol: Use the SSL transport protocol
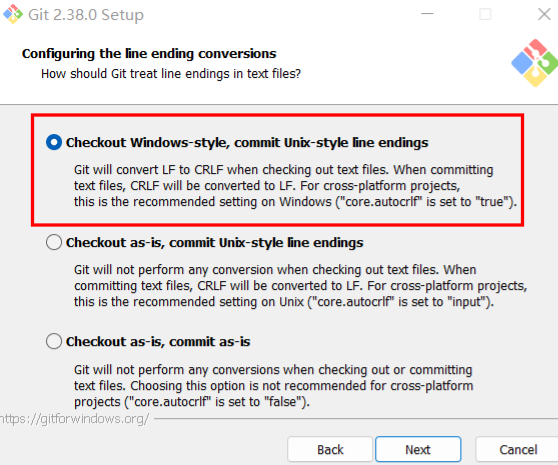
1.5.9 Configuring the line ending conversions
Select the first option
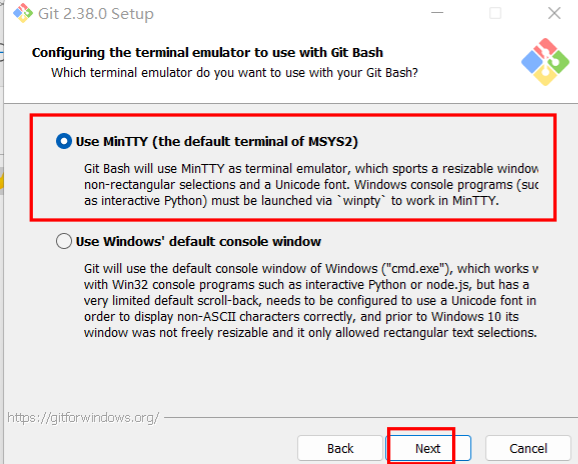
1.5.10 Terminal emulator
First option: Use Git's dedicated window (recommended)
Second option: Use Windows' cmd command line window.
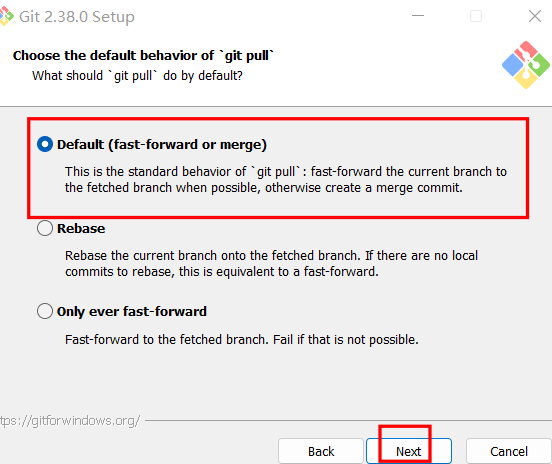
1.5.11 For everything else, just keep the defaults and complete the installation
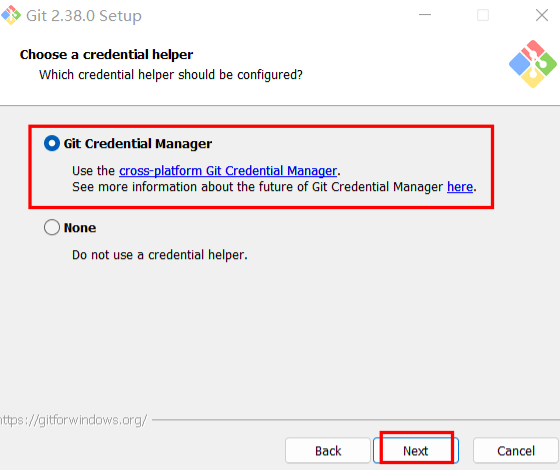
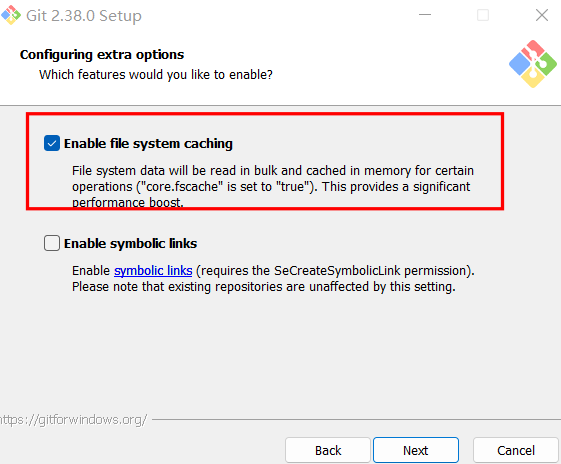
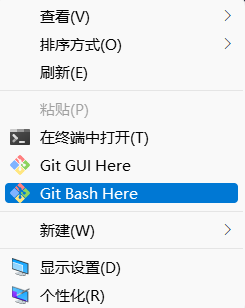
After installation, you can right-click in any directory to open the Git command line window.
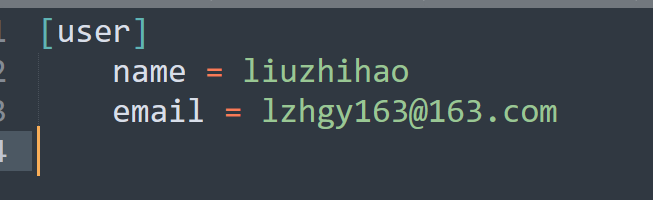
Since Git is a distributed version control system, you need to fill in a username and email as an identifier.
--global indicates global properties, which will be shared by all Git projects
git config --global user.name "username"
git config --global user.email "user email"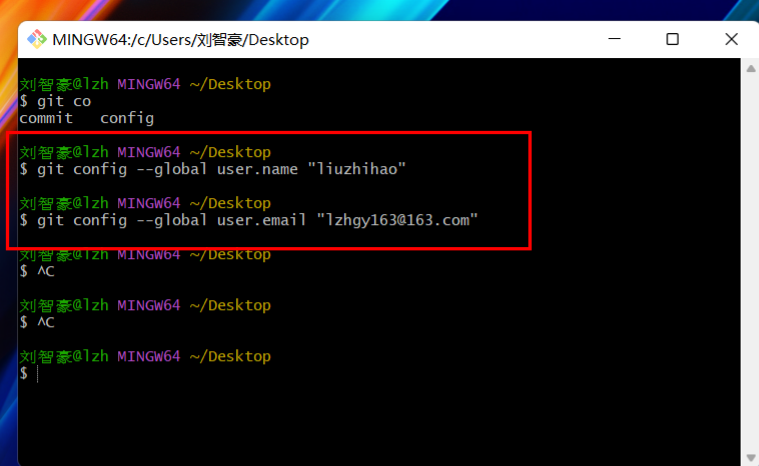
You can see this in the .gitconfig file at C:\Users\Administrator. If you don't want to use commands, you can also set it directly in the file.
2. Git in Practice
2.1 Creating a Local Repository
Create a directory (to serve as the local repository): C:\GITRepository\git-demo
Open a Git Bash window in the C:\GITRepository\git-demo directory and initialize the repository: git init

Linux commands can be used in the Git Bash window.
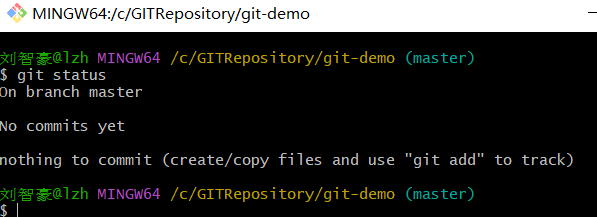
2.2 Checking Status
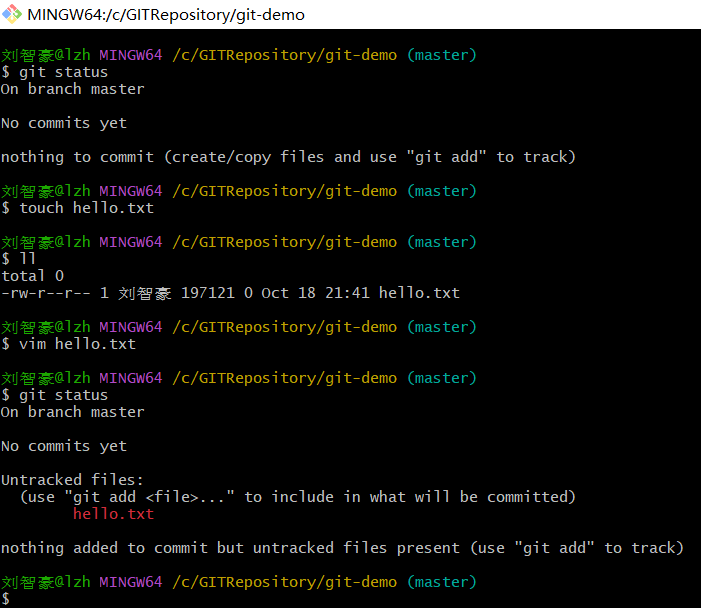
2.3 Creating and Editing Files
2.4 Adding Files to the Staging Area
git add hello.txt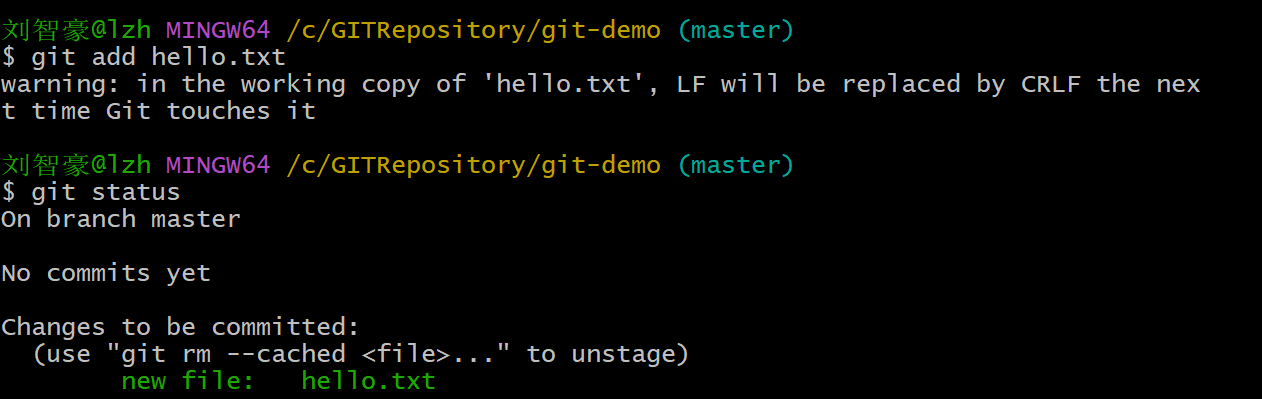
2.5 Committing Files to the Local Repository
-m is followed by the commit message
git commit -m "first commit" hello.txt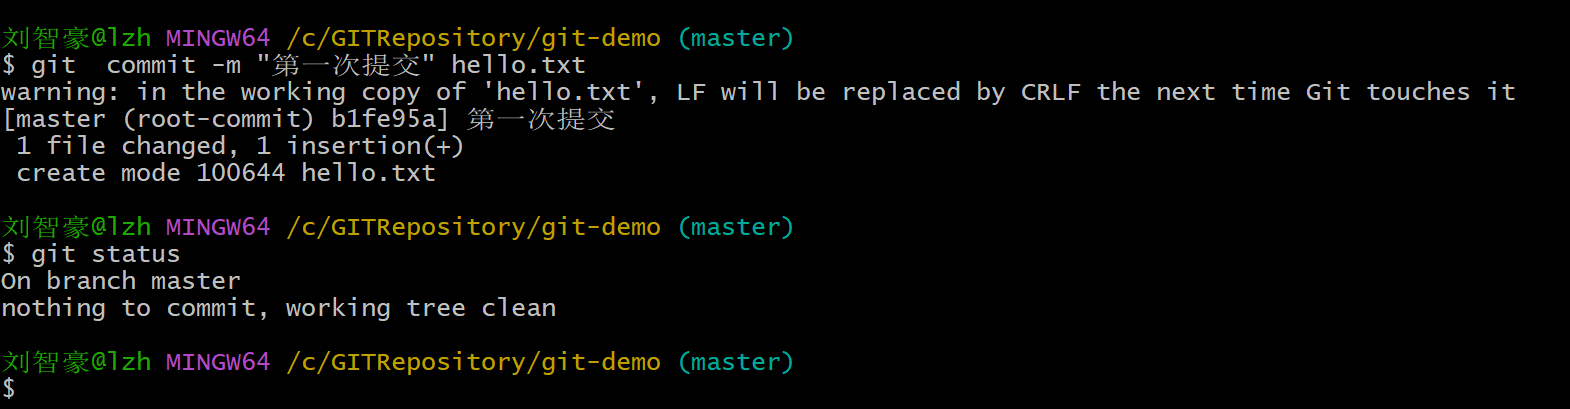
View version information
$ git log2.6 Modifying Files
Modify the hello.txt file and add some content
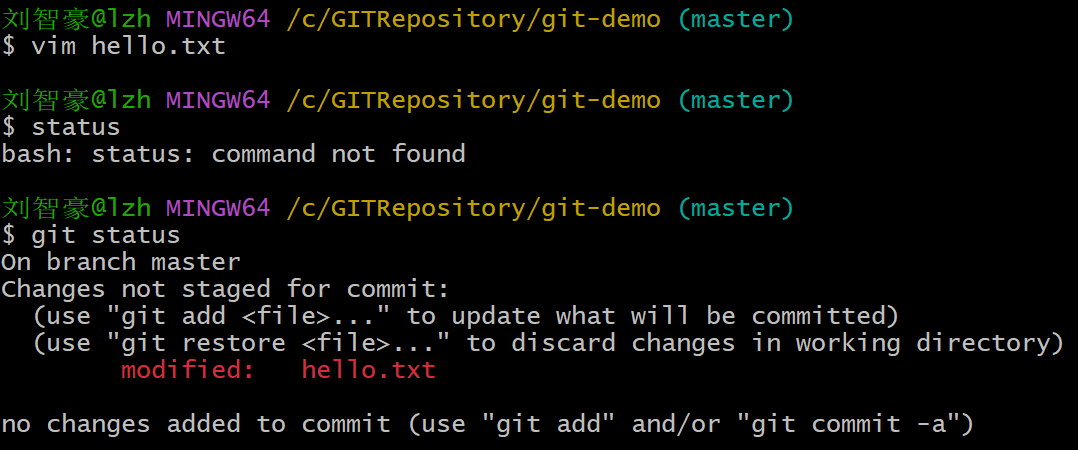
After modifying, check the status — the hello file shows up in red again, indicating that the modified file hasn't been added to the staging area yet.
Add it to the staging area and commit the changes
git add hello.txt
git commit -m "second commit" hello.txt
2.7 Version History
2.7.1 Viewing Version History
git reflog  View version information

git log  View detailed version information
2.7.2 Selecting a Version
git reset --hard version_number3. Git Branches
After the system goes live, you need to fix bugs and develop new features at the same time. Since the new features aren't finished, you need to create a branch — fixing bugs on one side while developing new features on the other, and finally merging them.
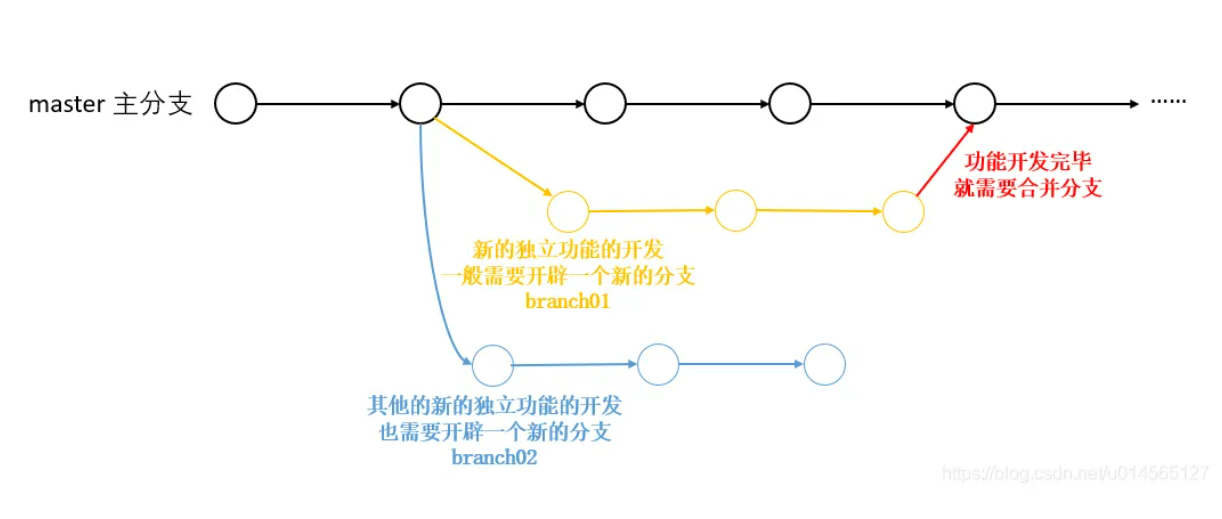
3.1 Viewing Branches
git branch -v
3.2 Creating a Branch
Create a test branch: git branch <branch name>
git branch test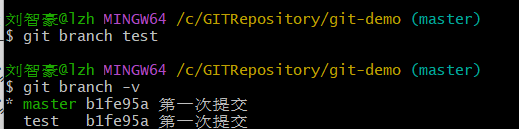
3.3 Switching Branches
Switch to the test branch: git checkout <branch name>
3.3.1 On the test branch, create a.java, add it to the staging area, and commit it to the local repository
touch a.java
git add a.java
git commit -m "first commit on test branch" a.txt
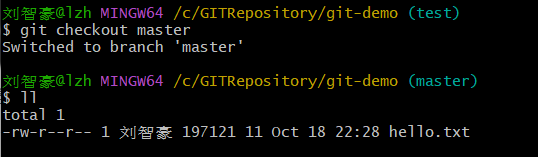
3.3.2 Switch back to the master branch and check if there are any changes
git chechout master
ls
You'll find that a.java created on the test branch doesn't exist on master.
3.4 Merging Branches
First switch to the main branch, then merge the branch
git checkout master
git merge test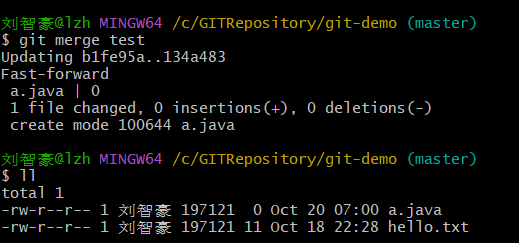
At this point, you can see the changes from the test branch — the branch merge is complete.
3.5 Deleting Branches
Delete the test branch
git branch -d testView branches
git branch -v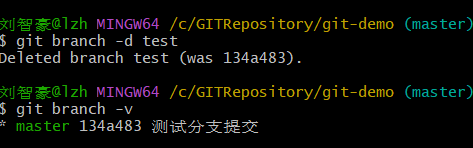
3.6 Version Conflicts
3.6.1 Operations on the test branch
Create the test branch
git branch test
Switch to the branch
git checkout test
Modify a.java, add 1 line of data
vim a.java
Add a.java to the staging area
git add a.java
Commit a.java to the local repository
git commit -m "test modified a.java"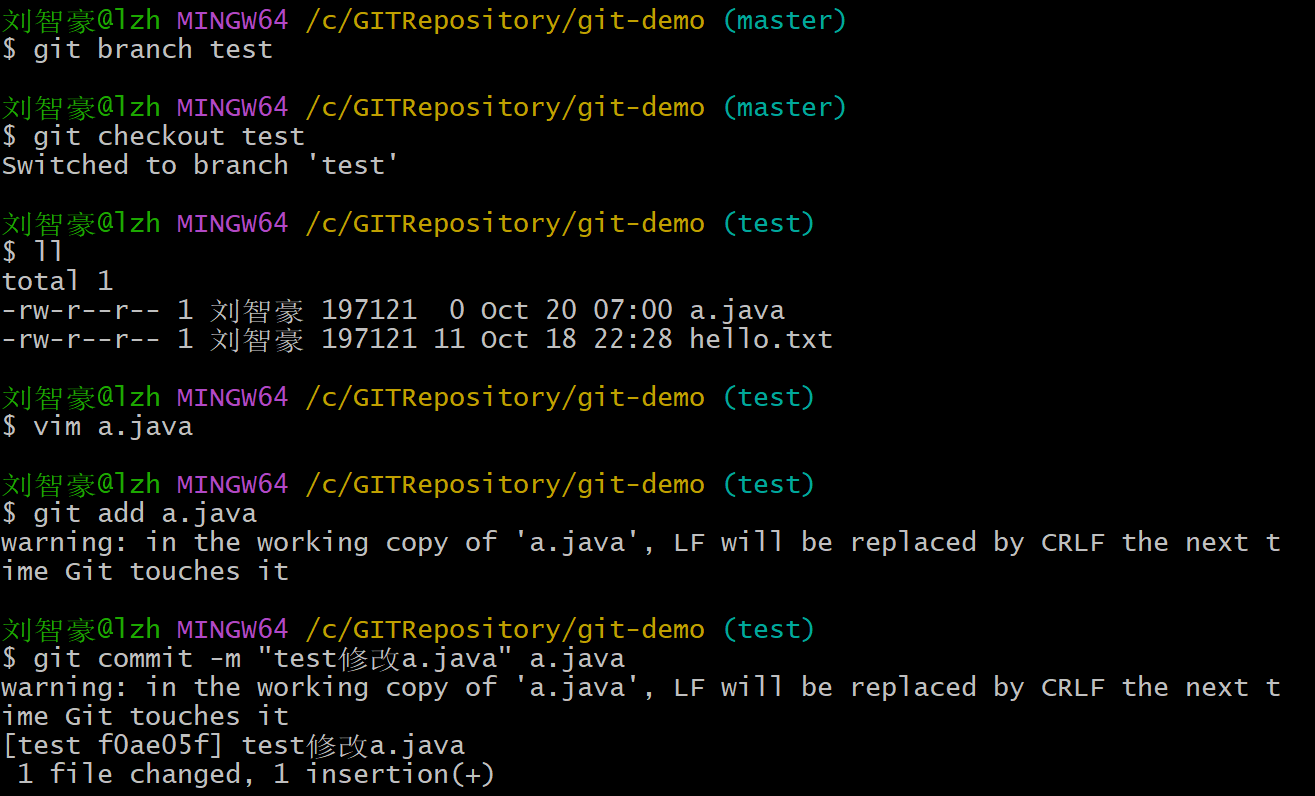
3.6.2 Operations on the master branch
Switch to the master branch
git checkout master
Modify a.java, add 1 line of data
vim a.java
Add a.java to the staging area
git add a.java
Commit a.java to the local repository
git commit -m "test modified a.java" a.java
A conflict occurs
git merge test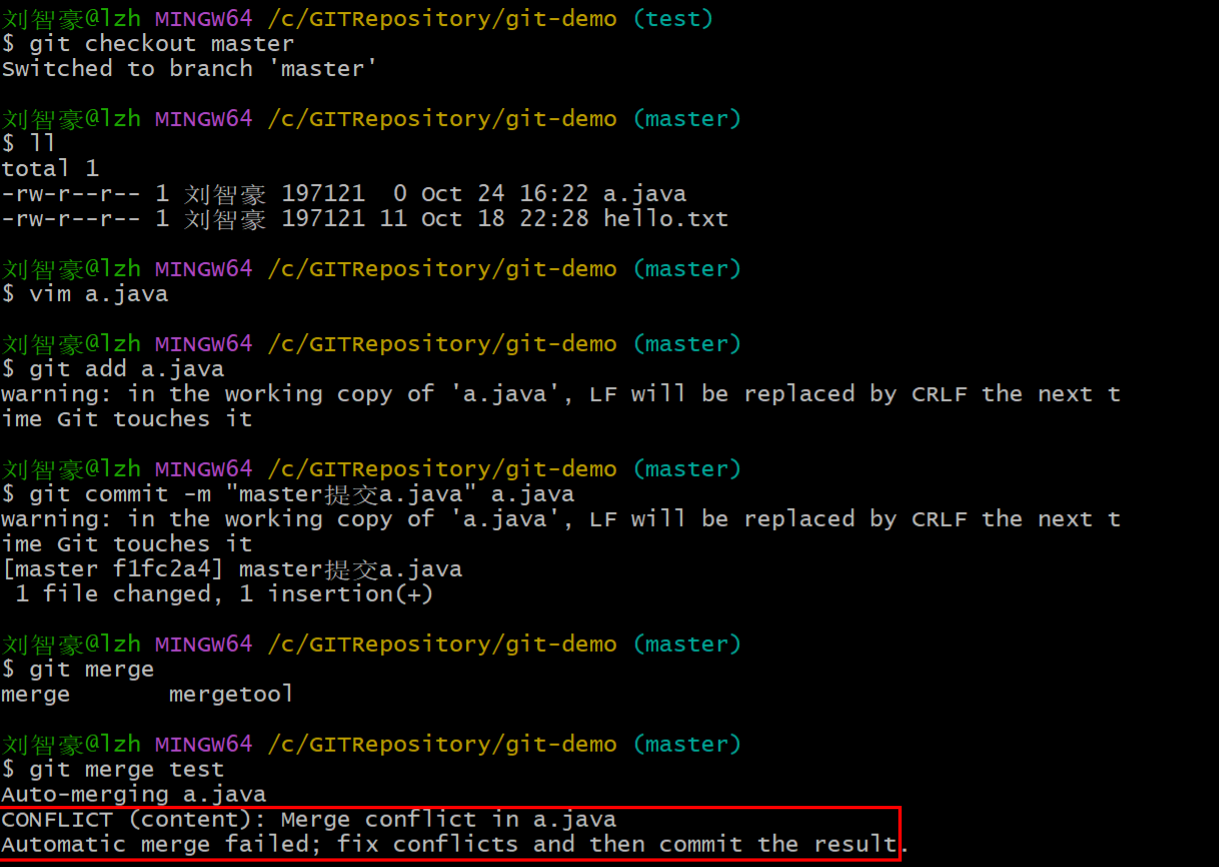
Reason for the conflict: The test branch and the master branch have two different sets of modifications at the same location in the same file. Git cannot decide which set of code to use, so a human must manually determine the content of the new code.
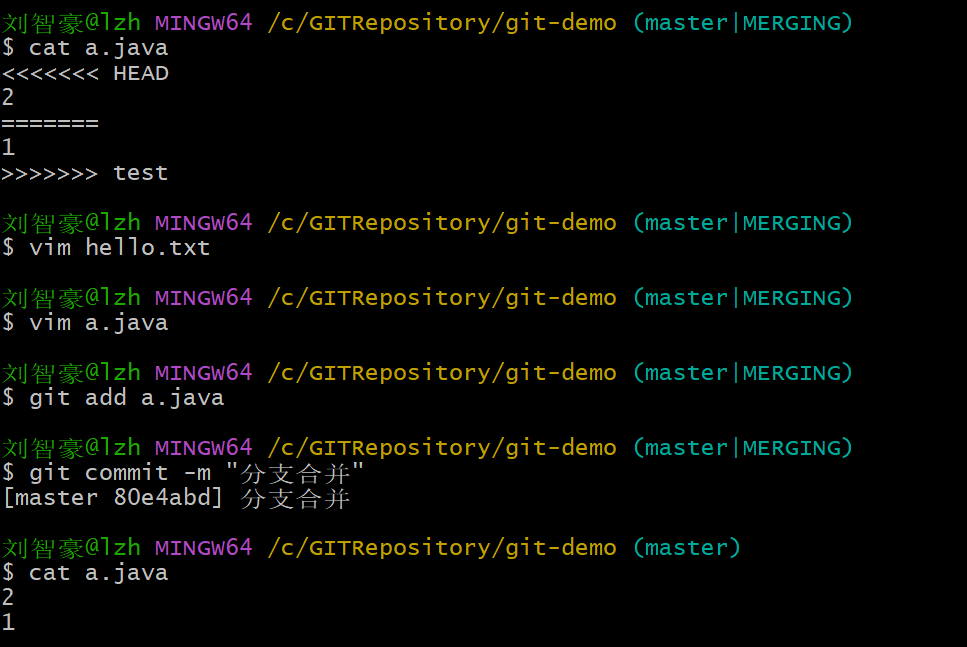
3.6.3 Resolving the Conflict
View the conflicting file
cat a.java
Manually resolve by modifying the conflicting file, keeping the code you need
vim a.java
Add and commit to resolve the conflict
git add a.java
git commit -m "branch merge, conflict resolved"
4. Integrating Git with IDEA
4.1 Configuring Ignore Files
These files are unrelated to the actual functionality of the project and are not deployed or run on the server. Ignoring them helps mask differences between IDE tools.
# Compiled class file
*.class

# Eclipse
.project
.classpath
.settings/

# Intellij
*.ipr
*.iml
*.iws
.idea/

# Maven
target/

# Gradle
build
.gradle

# Log file
*.log
log/

# out
**/out/

# Mac
.DS_Store

# others
*.jar
*.war
*.zip
*.tar
*.tar.gz
*.pid
*.orig
temp/
Create a git.ignore file, add the above content to it, and reference it in ~/.gitconfig
Note: Use "forward slashes (/)", not "backslashes ()"
[user]
	name = liuzhihao
	email = lzhgy163@163.com
[core]
	excludesfile =C:/Users/刘智豪/git.ignore
4.2 Locating the Git Installation
Top-left corner: File -> Settings
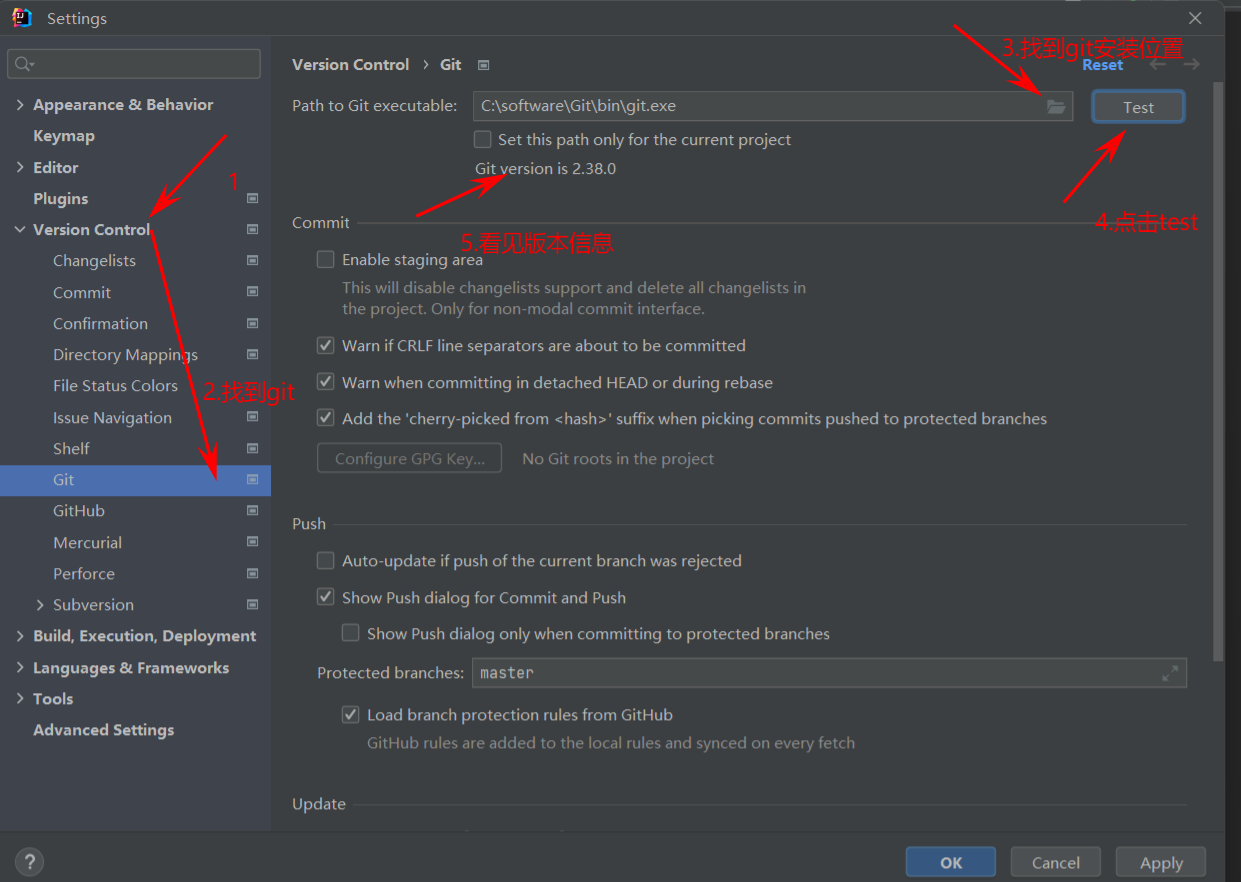
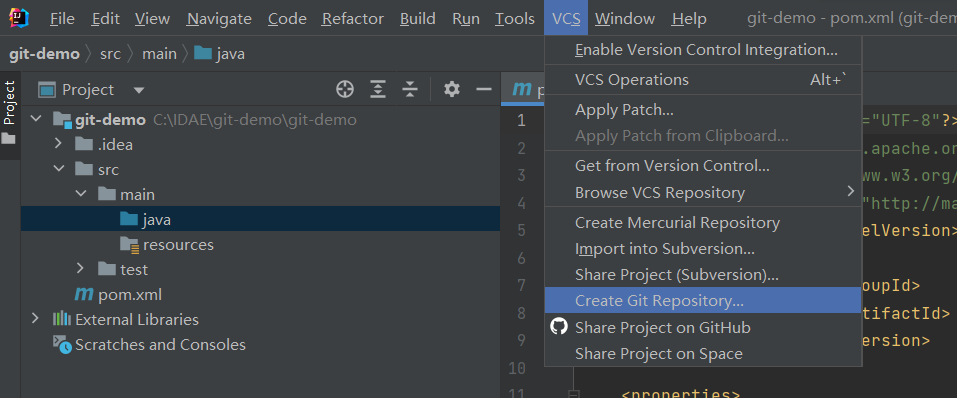
4.3 Initializing Version Information
4.4 Adding to the Staging Area
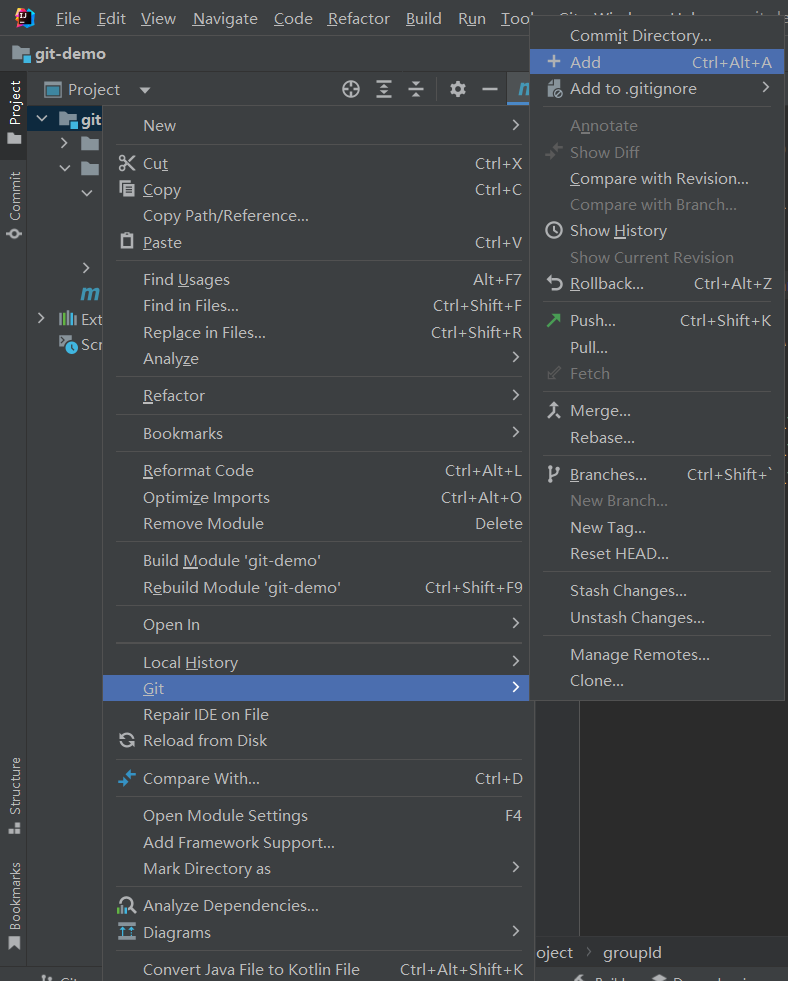
Right-click the project, select Git -> Add to add the project to the staging area.
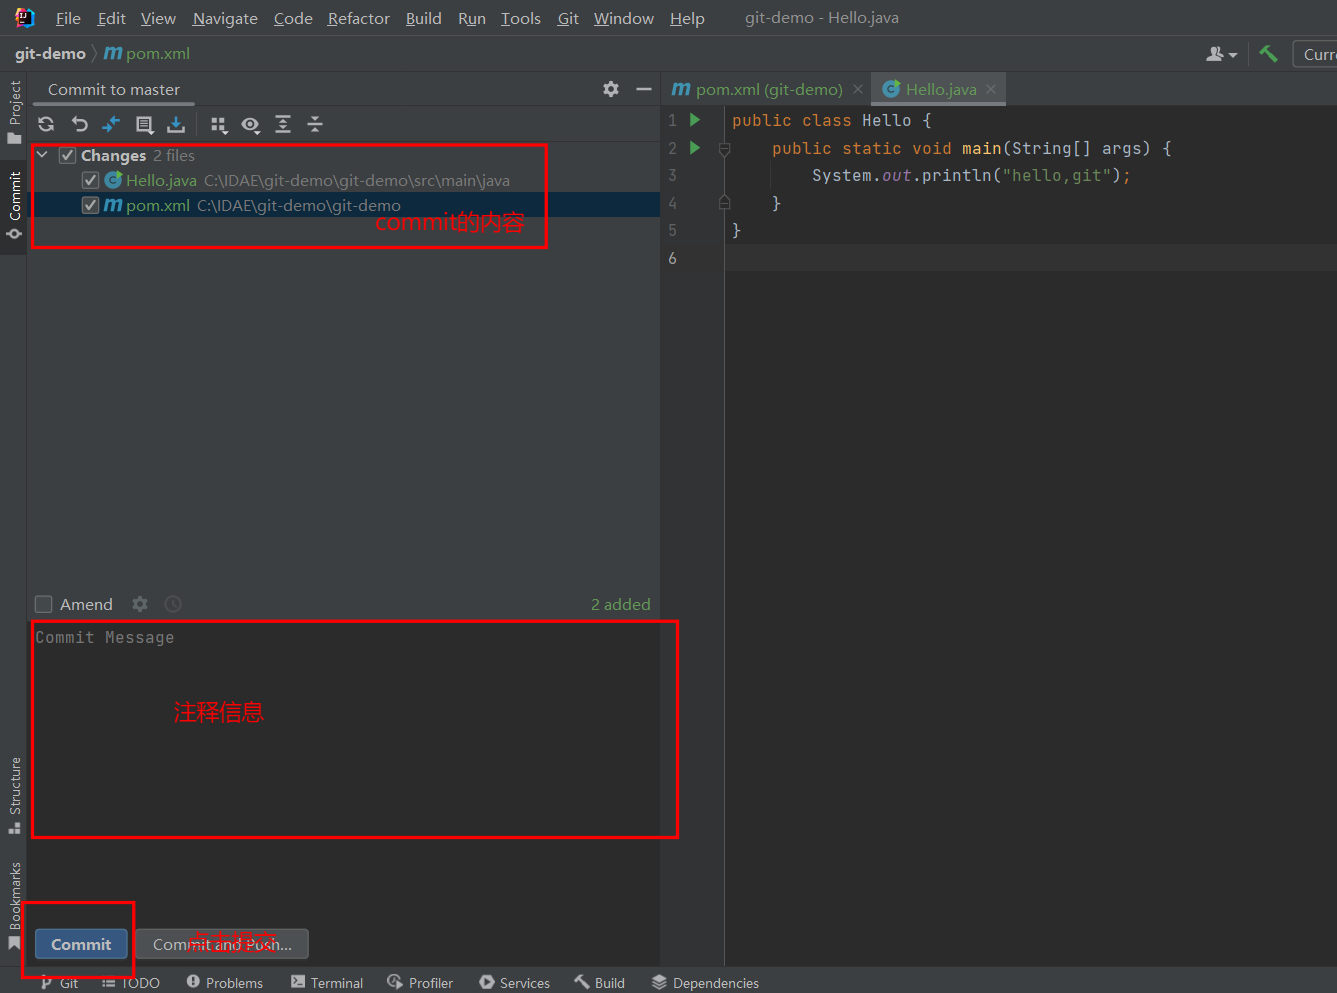
4.5 Committing to the Local Repository

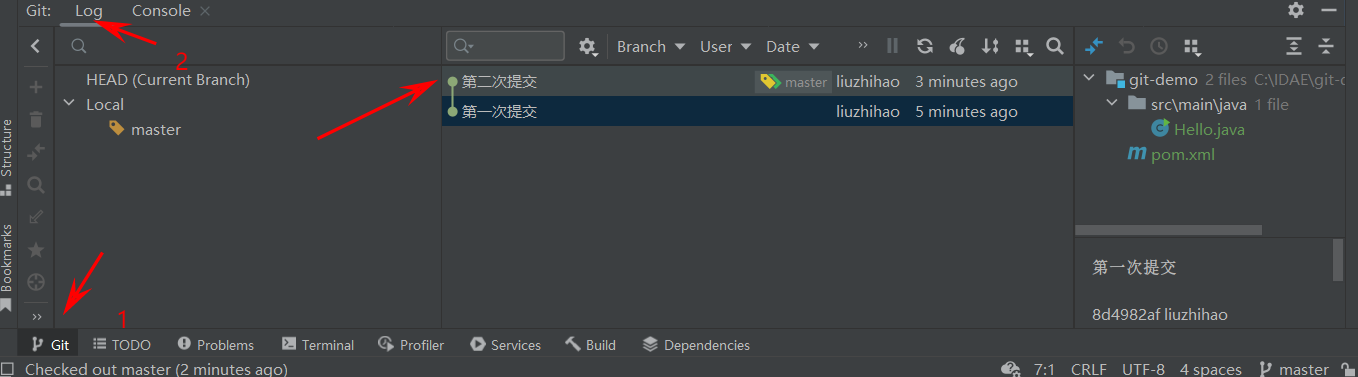
4.6 Switching Versions
In the bottom-left corner of IDEA, click Git, then click Log to view versions.
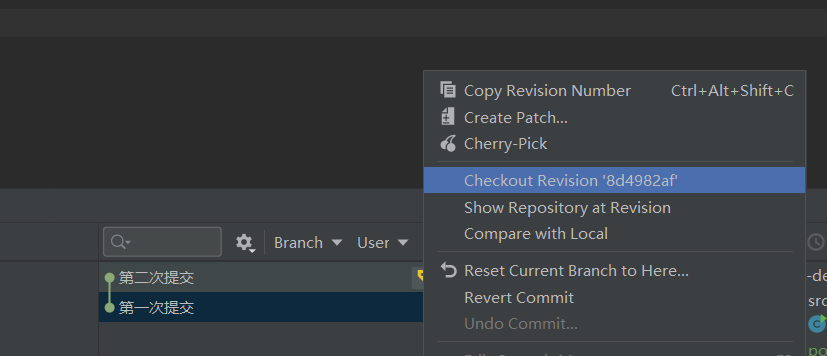
Right-click the version you want to switch to, then click Checkout Revision in the menu.
4.7 Creating Branches
Git -> Branches
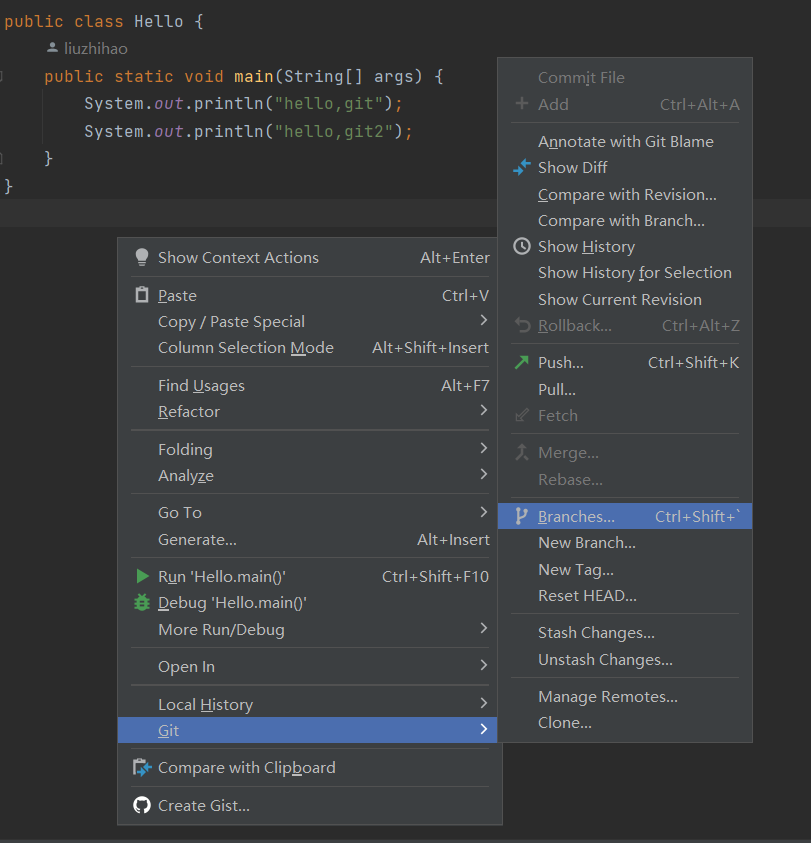
In the Git Branches dialog that appears, click the New Branch button.
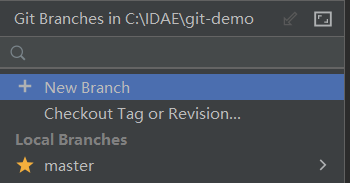
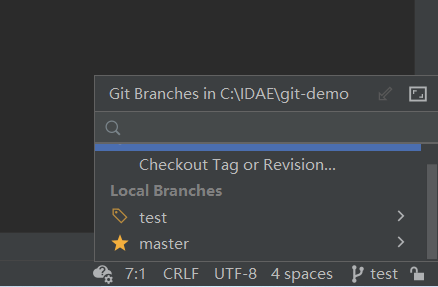
4.8 Switching Branches
You can select a branch from the bottom-right corner.
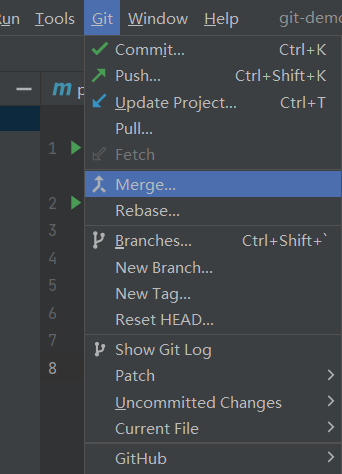
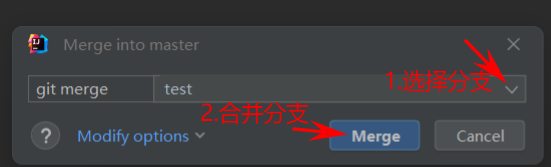
4.9 Merging Branches
Git -> Merge
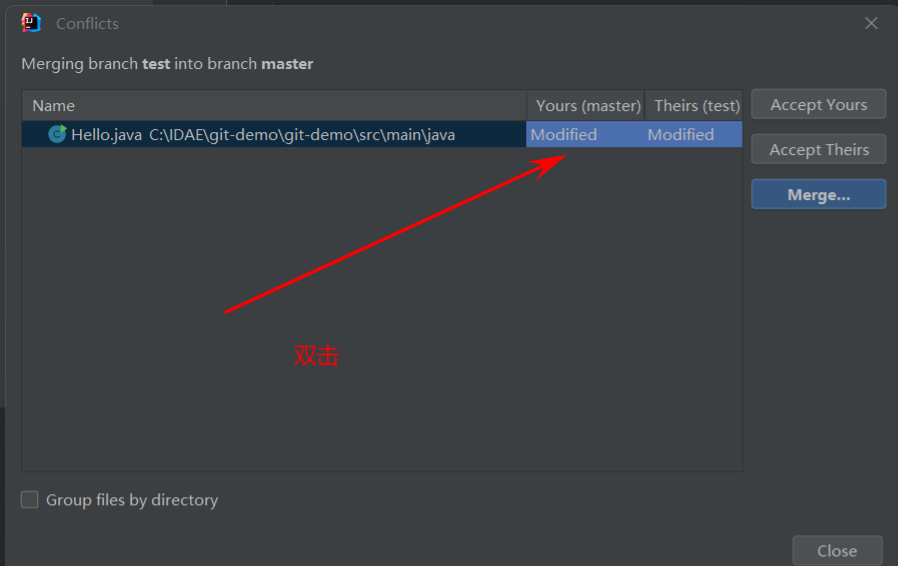
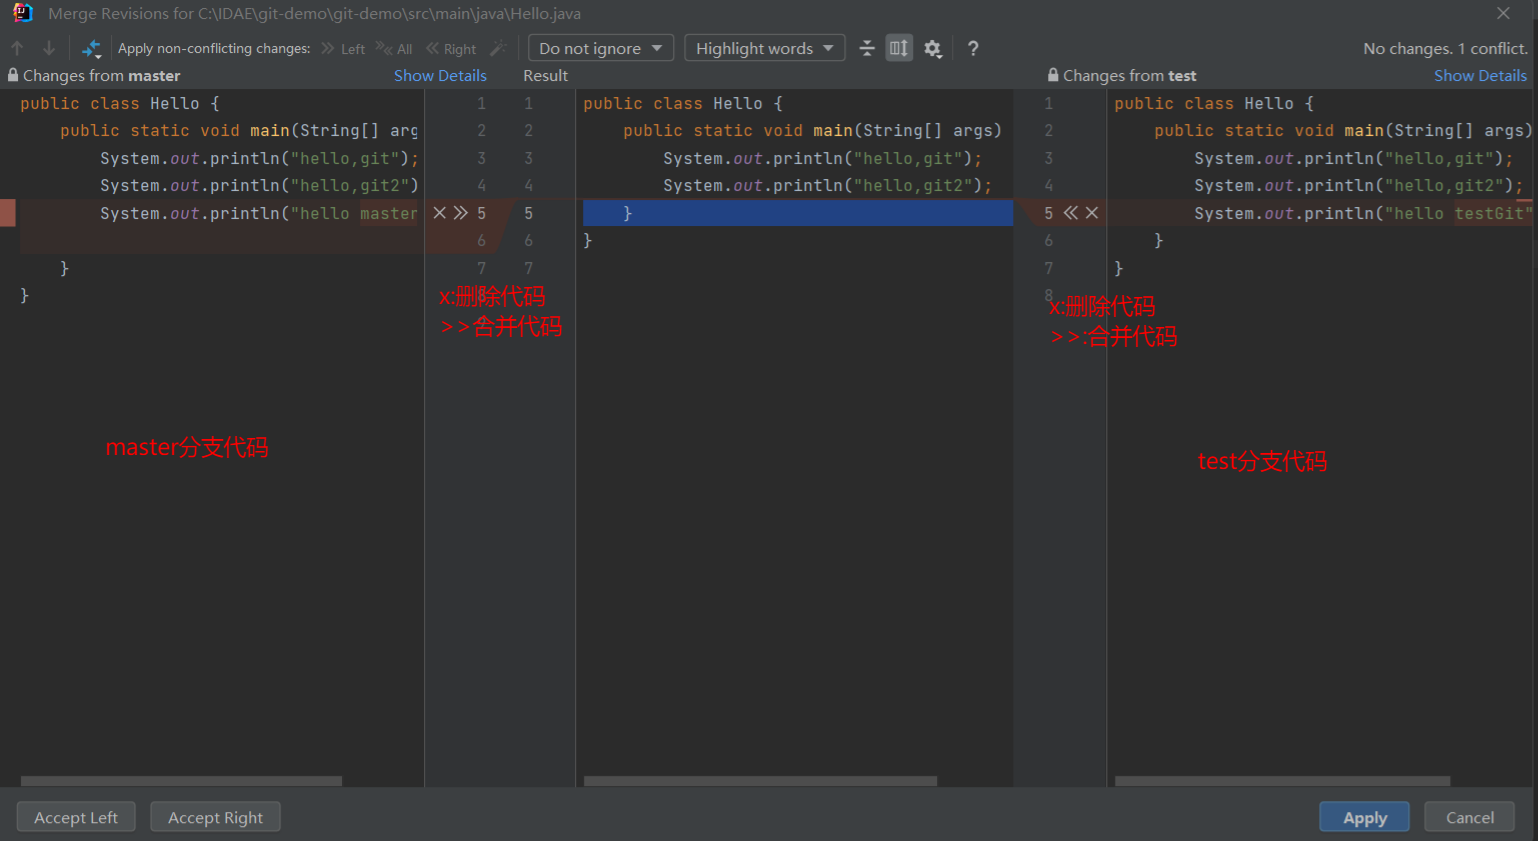
4.10 Version Conflicts
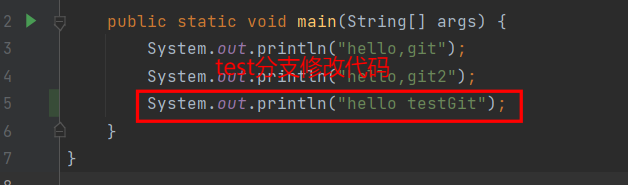
Modify code on the test branch and commit it to the repository
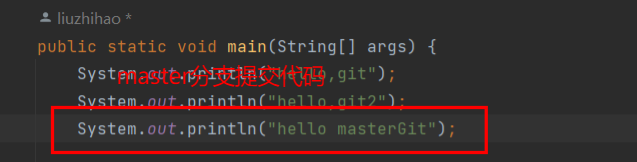
Modify code at the same location on the master branch and commit it to the repository
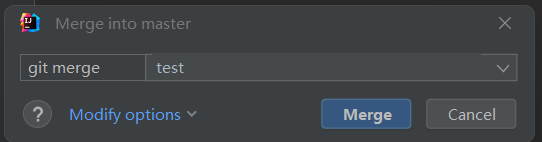
Merge the test branch into the master branch
A conflict occurs — resolve it manually
5. Gitee
Gitee is a code hosting and collaborative development platform launched by the Open Source China community. It supports Git and provides free private repository hosting. Gitee has now become the largest code hosting platform in China. It helps developers store and manage their project source code, tracks, records, and controls user modifications to their code, and provides a stable, efficient, and secure cloud-based software development collaboration platform. Whether for individuals, teams, or enterprises, Gitee enables code hosting, project management, and collaborative development. Its website is https://gitee.com/, it works just like GitHub, and it's also a Chinese-language site.
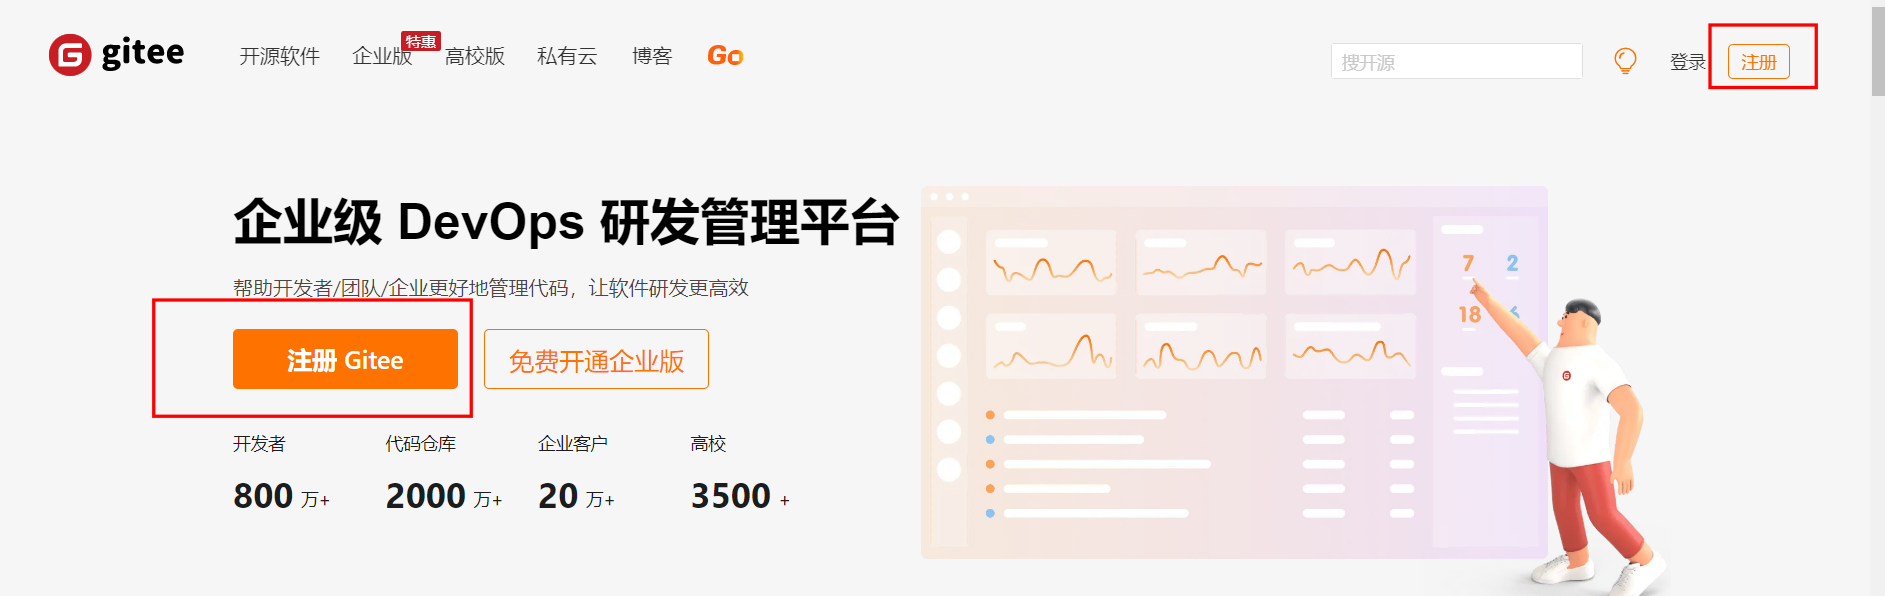
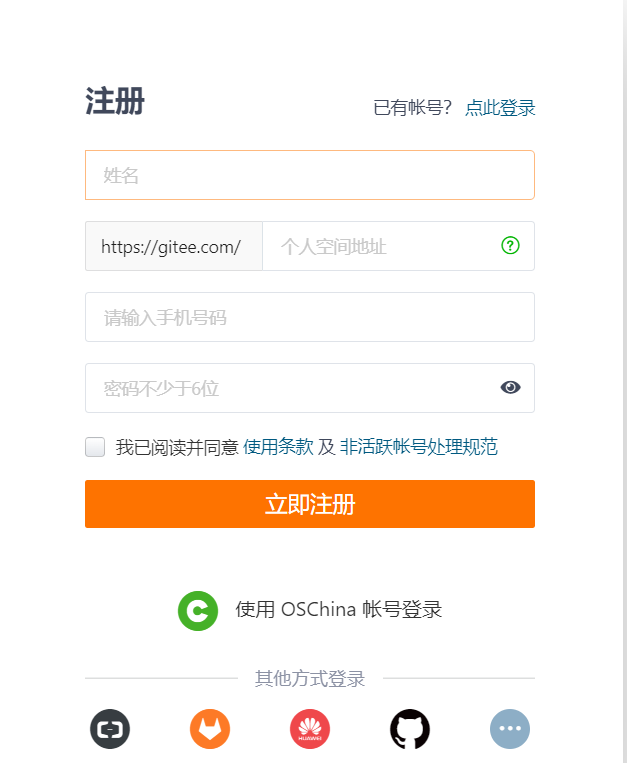
5.1 Account Registration
Go to the official website https://gitee.com/, click Register, and fill in the required information in order.
5.2 Account Login
Enter your username and password to log in.

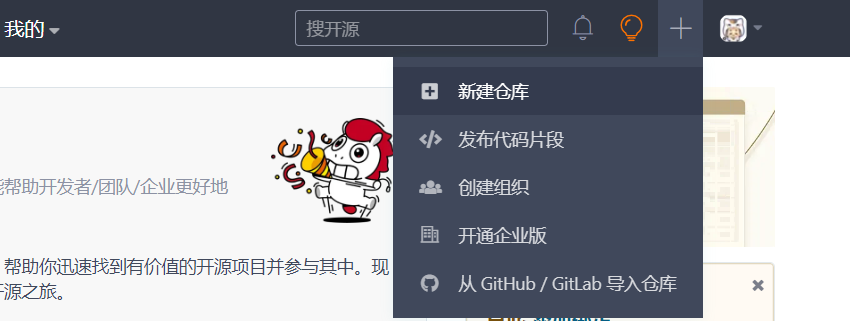
5.3 Creating a Remote Repository
Click "Create Repository" in the top-right corner.

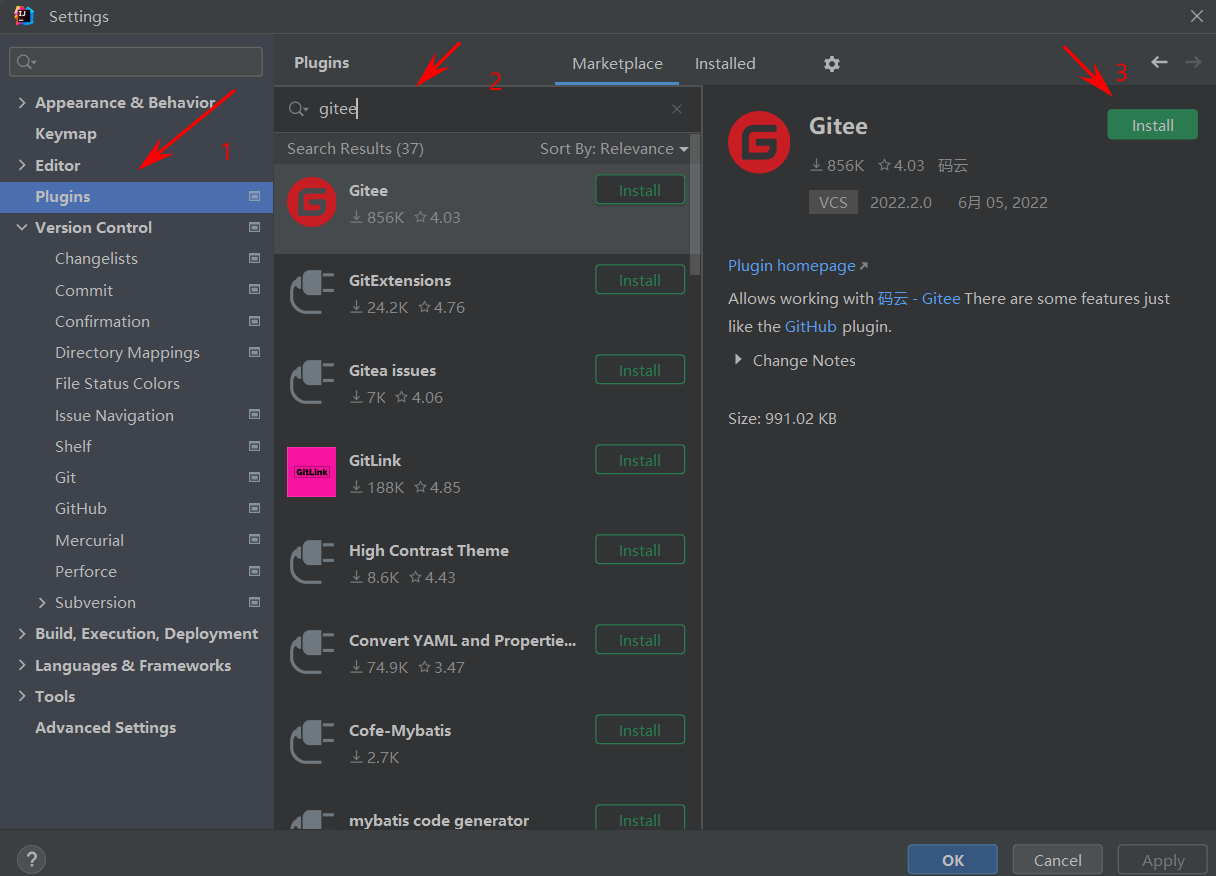
5.4 Integrating Gitee with IDEA
Install the Gitee plugin
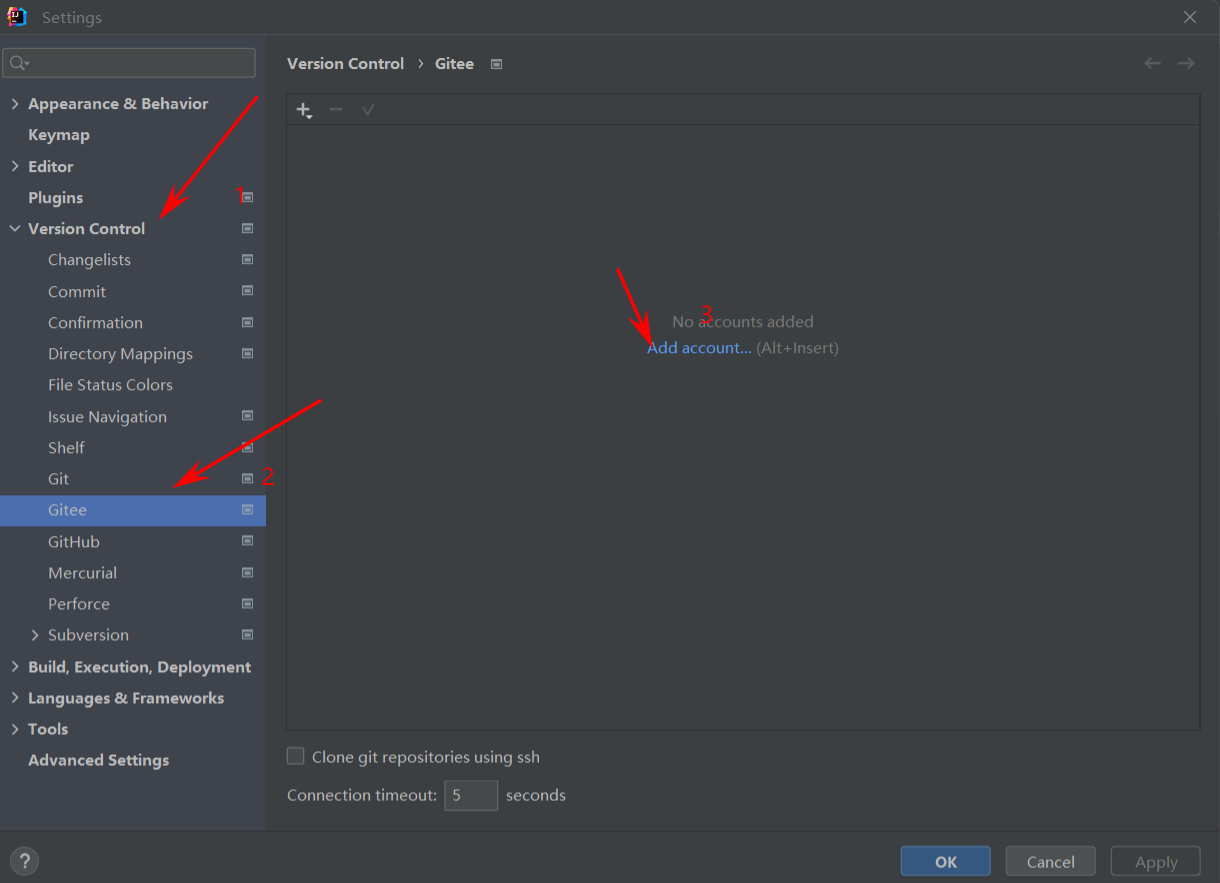
Log in with your username and password
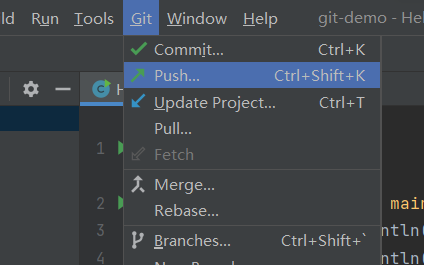
Push local code to the Gitee remote repository
Custom remote repository connection
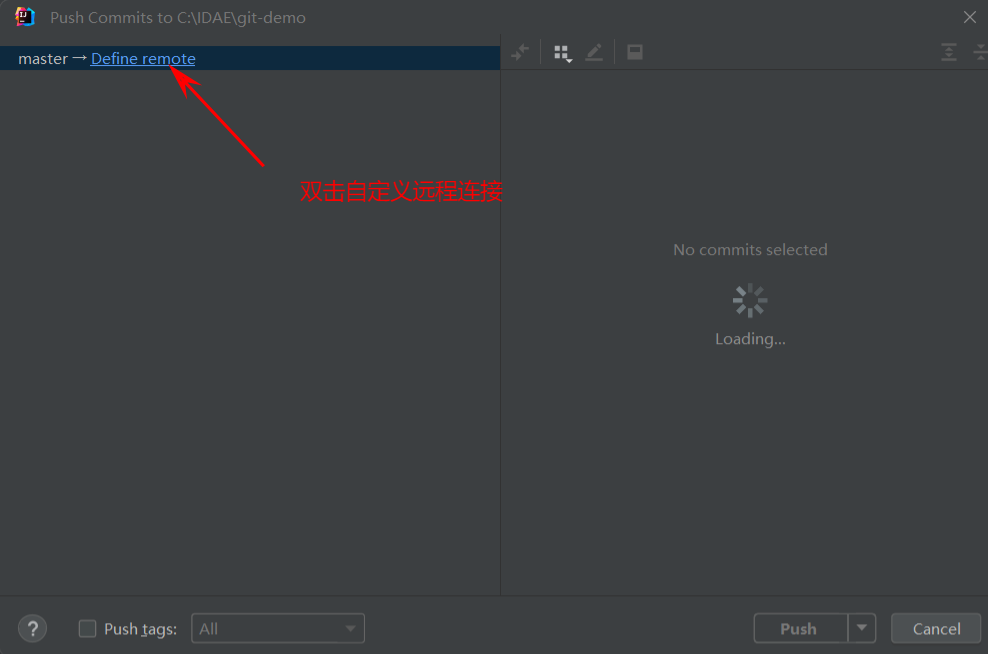
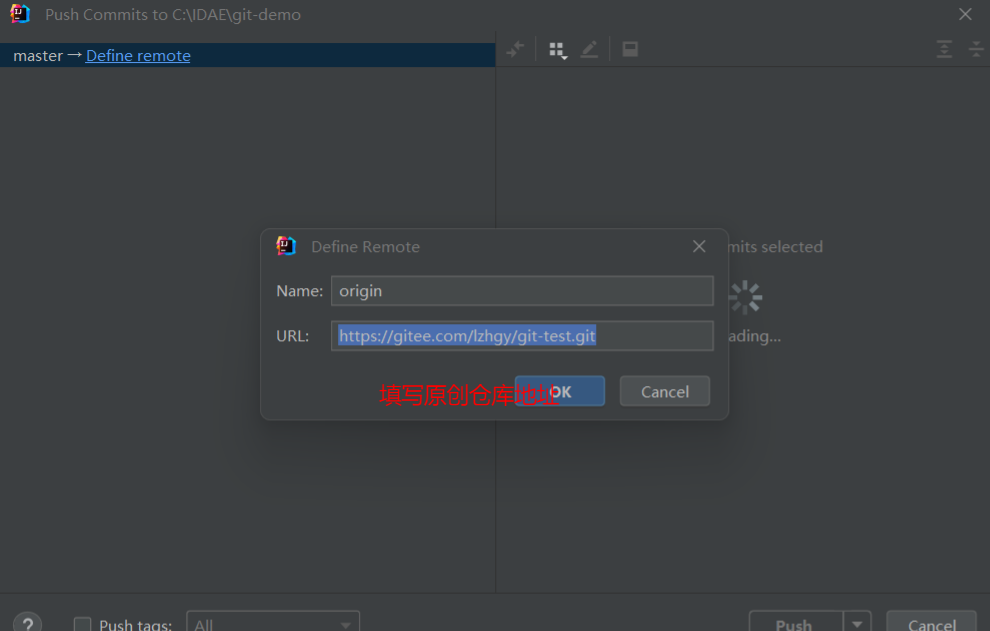
Click Push to complete the upload.
Comments(0)